Table of Contents:
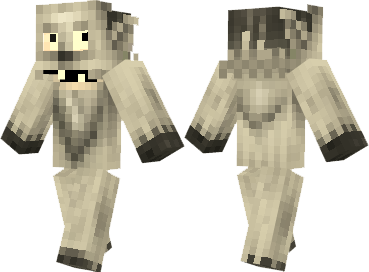
Skin…. As you have noticed, this should be the first article about skins in this website. Everyone of you should know what a skin is or how it works. Skin is like a texture pack, instead it changes only your character, not the surroundings. Lets go into the point. Have you ever seen a real yeti, actually its kinda like a legend monster. For those who has never seen a yeti OR doesn’t know what it is, the yeti looks like a gorilla with white skin and lives in Icy,cold biomes. Now you can be a yeti in Minecraft! The popular Yeti skin( with real moving eyes and mouth!) is now right before your eyes. Thanks to the creator (halucid) of this skin we have a nice and fine skin to use. You should be wondering how could this “Yeti skin” get so popular (more popular than some mods)? Some people say that it’s because of the real moving eyes and mouth and how the developer create it in details. Well, I would agree with that, when I saw this:
It’s quite nice. For those who don’t know how to change skins look here
Minecraft Yeti Skin Installation:
For official game version:
Skin Installation:
- Download skin from the link provided below
- Go to Minecraft.net > Click profile > Browse your new Skin
- Upload image
- Done and enjoy new skin
Installation on unofficial Minecraft versions 1.7.10 and higher:
- Download the skin and rename it to steve.png.
- Open the game data folder. To do this, press WIN + R and enter %AppData%.minecraft.
- Open the folder whose name corresponds to your version of the game.
- Inside there will be a file [version of the game].jar, which must be opened using any archiver program (for example, WinRAR or 7Zip).
- Inside the archive, go this way through the folders: assets> minecraft> textures> entity.
- Drop the steve.png file into this folder by dragging it with the mouse into the archiver window.
- Start the game and evaluate the new look of the main character.
Installation on unofficial Minecraft versions 1.5.2-1.7.10:
-
-
- Download the skin and rename it to char.png.
- Open the game data folder. To do this, press WIN + R and enter %AppData%.minecraft.
- Go to the ‘bin’ folder and open the ‘minecraft.jar’ file with any archiver (for example, WinRAR or 7Zip).
- Inside the archive, open the mob folder.
- Drop the char.png file into this folder by dragging it with the mouse into the archiver window.
- Launch Minecraft and see if the changes take effect.
-


